Brovary city, Kyiv region
4B Lisova St.
Installation of the window sill
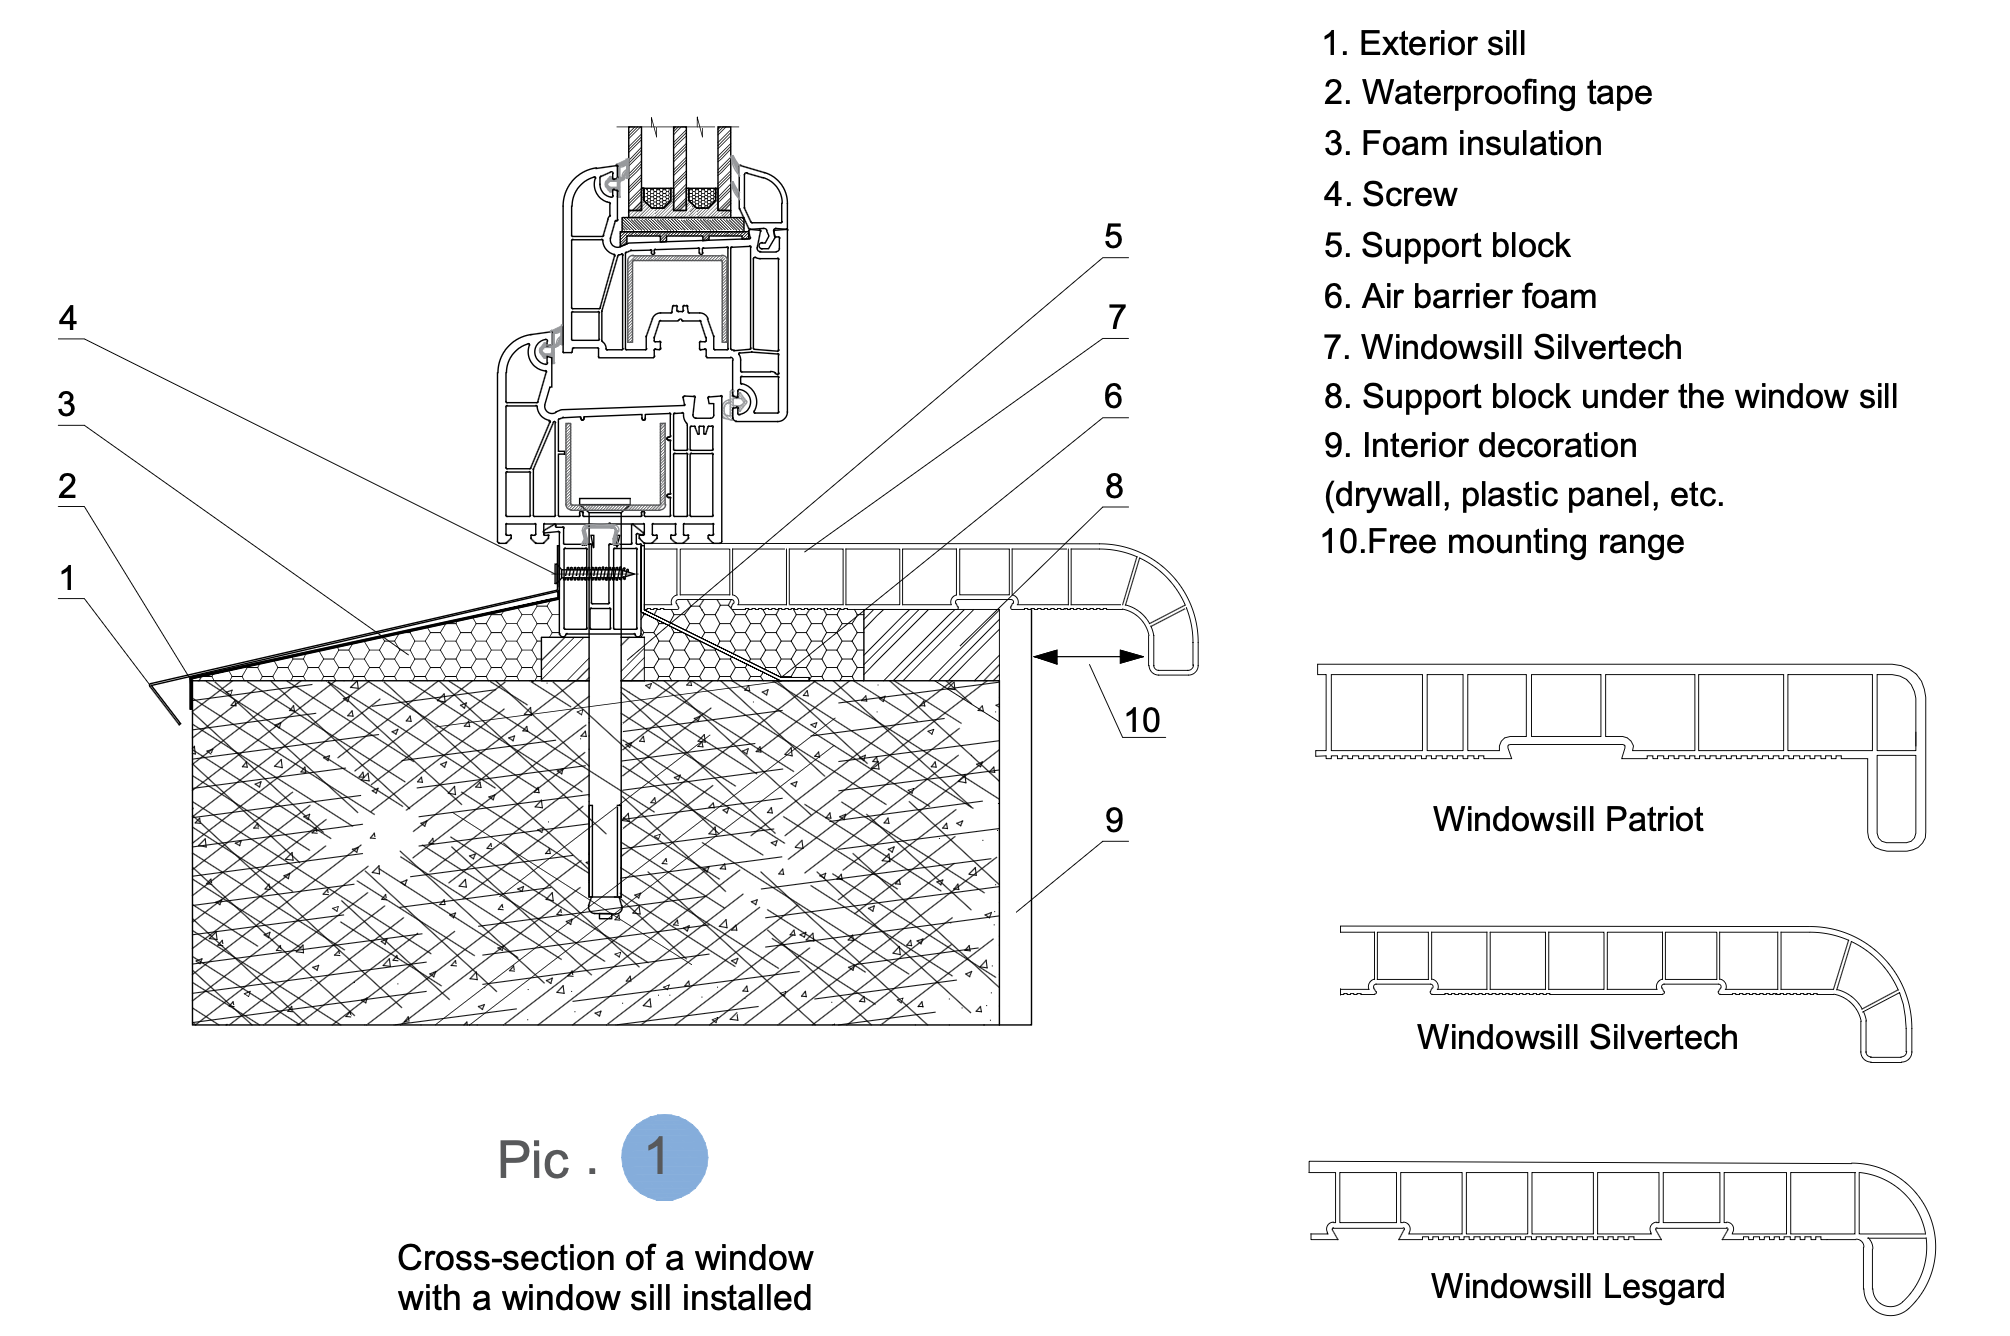
For a clear understanding of the components required for installing the window sill, as well as the principle of their connection, consider the cross-section of the window opening with the installed window sill (Fig. 1).
This method of installing the window sill is the most common and is suitable for most buildings, both residential and industrial.
1. Installation using mounting glue ("liquid nails") or cement mortar
This installation method is suitable for cases when the window structure does not have a special base profile, and the window sill is mounted directly on the surface of the window opening.
Window sills can be mounted using mounting glue or cement mortar on almost all building materials, such as solid brick, lightweight concrete, concrete, brick, plaster, wood.
Preparatory work:
The surface on which the window sill will be mounted must be clean, strong, dry, degreased and smooth over the entire surface.
Applying glue / mortar:
Apply glue (mortar) to the surface of the window opening. The width of the glue strips must be at least 10 mm. The distance between the two strips of glue is a maximum of 100 mm.
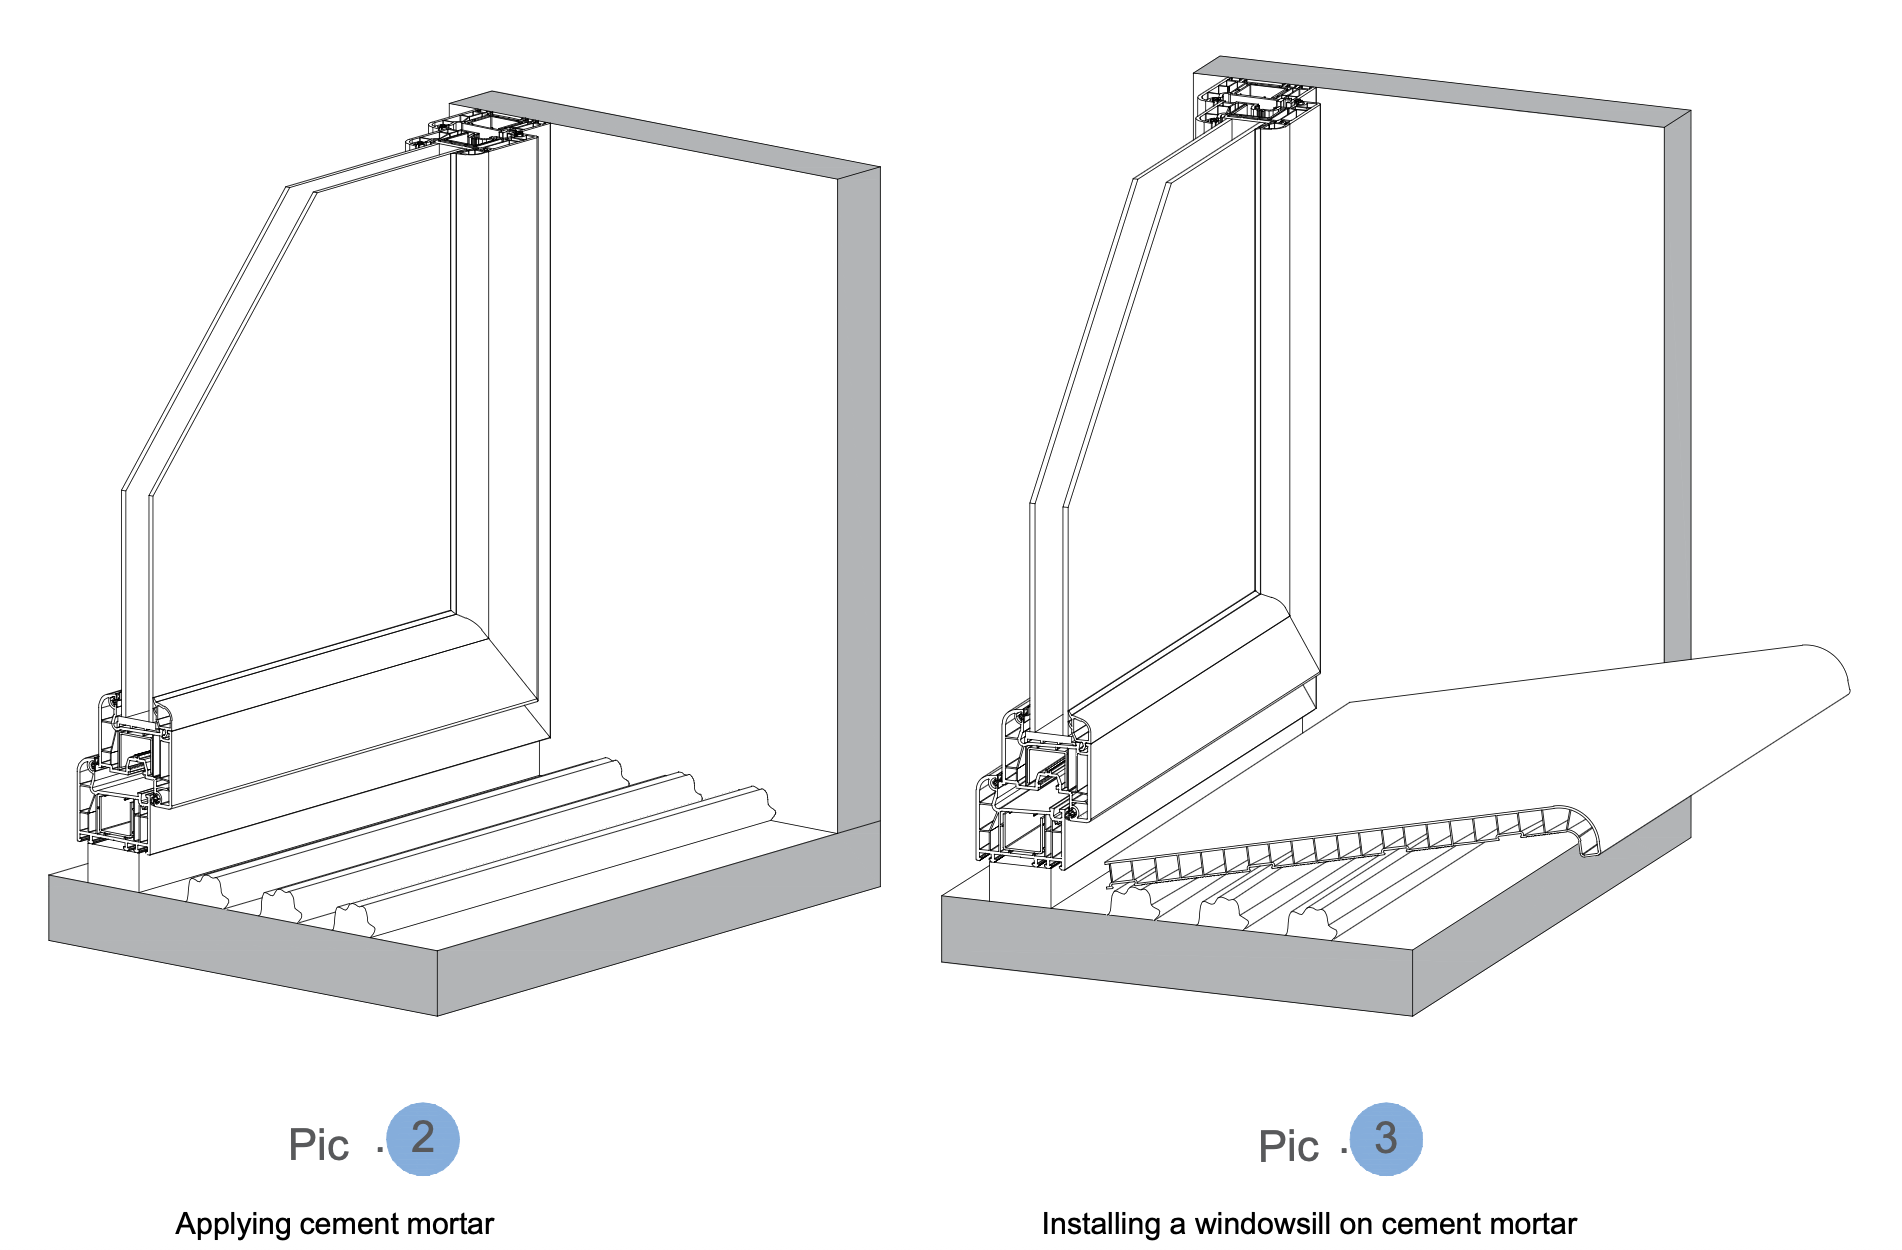
The cement mortar is applied evenly over the entire surface of the opening (Fig. 2).
Installation:
Place the window sill under the window frame and press it firmly against the base. Treat the junction of the window sill and the frame with silicone sealant (Fig. 3).
After that, the window sill must be pressed firmly from above until the glue (mortar) has completely hardened.
2. Installation using 2-component mounting foam
This is the most common and convenient method of installing window sills. It allows for effective installation of the window sill where the lower part of the window opening is too large for installation of the window sill directly on the base of the opening.
Preparatory work:
To accurately position the window sill on the base, it is necessary to install (at a maximum distance of 500 mm) pads of appropriate thickness (Fig. 4).
For better adhesion of the foam to the window sill, it is recommended to drill several holes on the lower surface of the window sill, in the places of adhesion to the foam.
IMPORTANT: THE CORRESPONDING HOLE MUST BE MADE BETWEEN THE INTERNAL PARTITIONS OF THE WINDOW SILL!
If the window structure has a special support profile, then you should start by installing Z-brackets (Fig. 5). This method of installation ensures improved pressure of the window sill to the window frame.
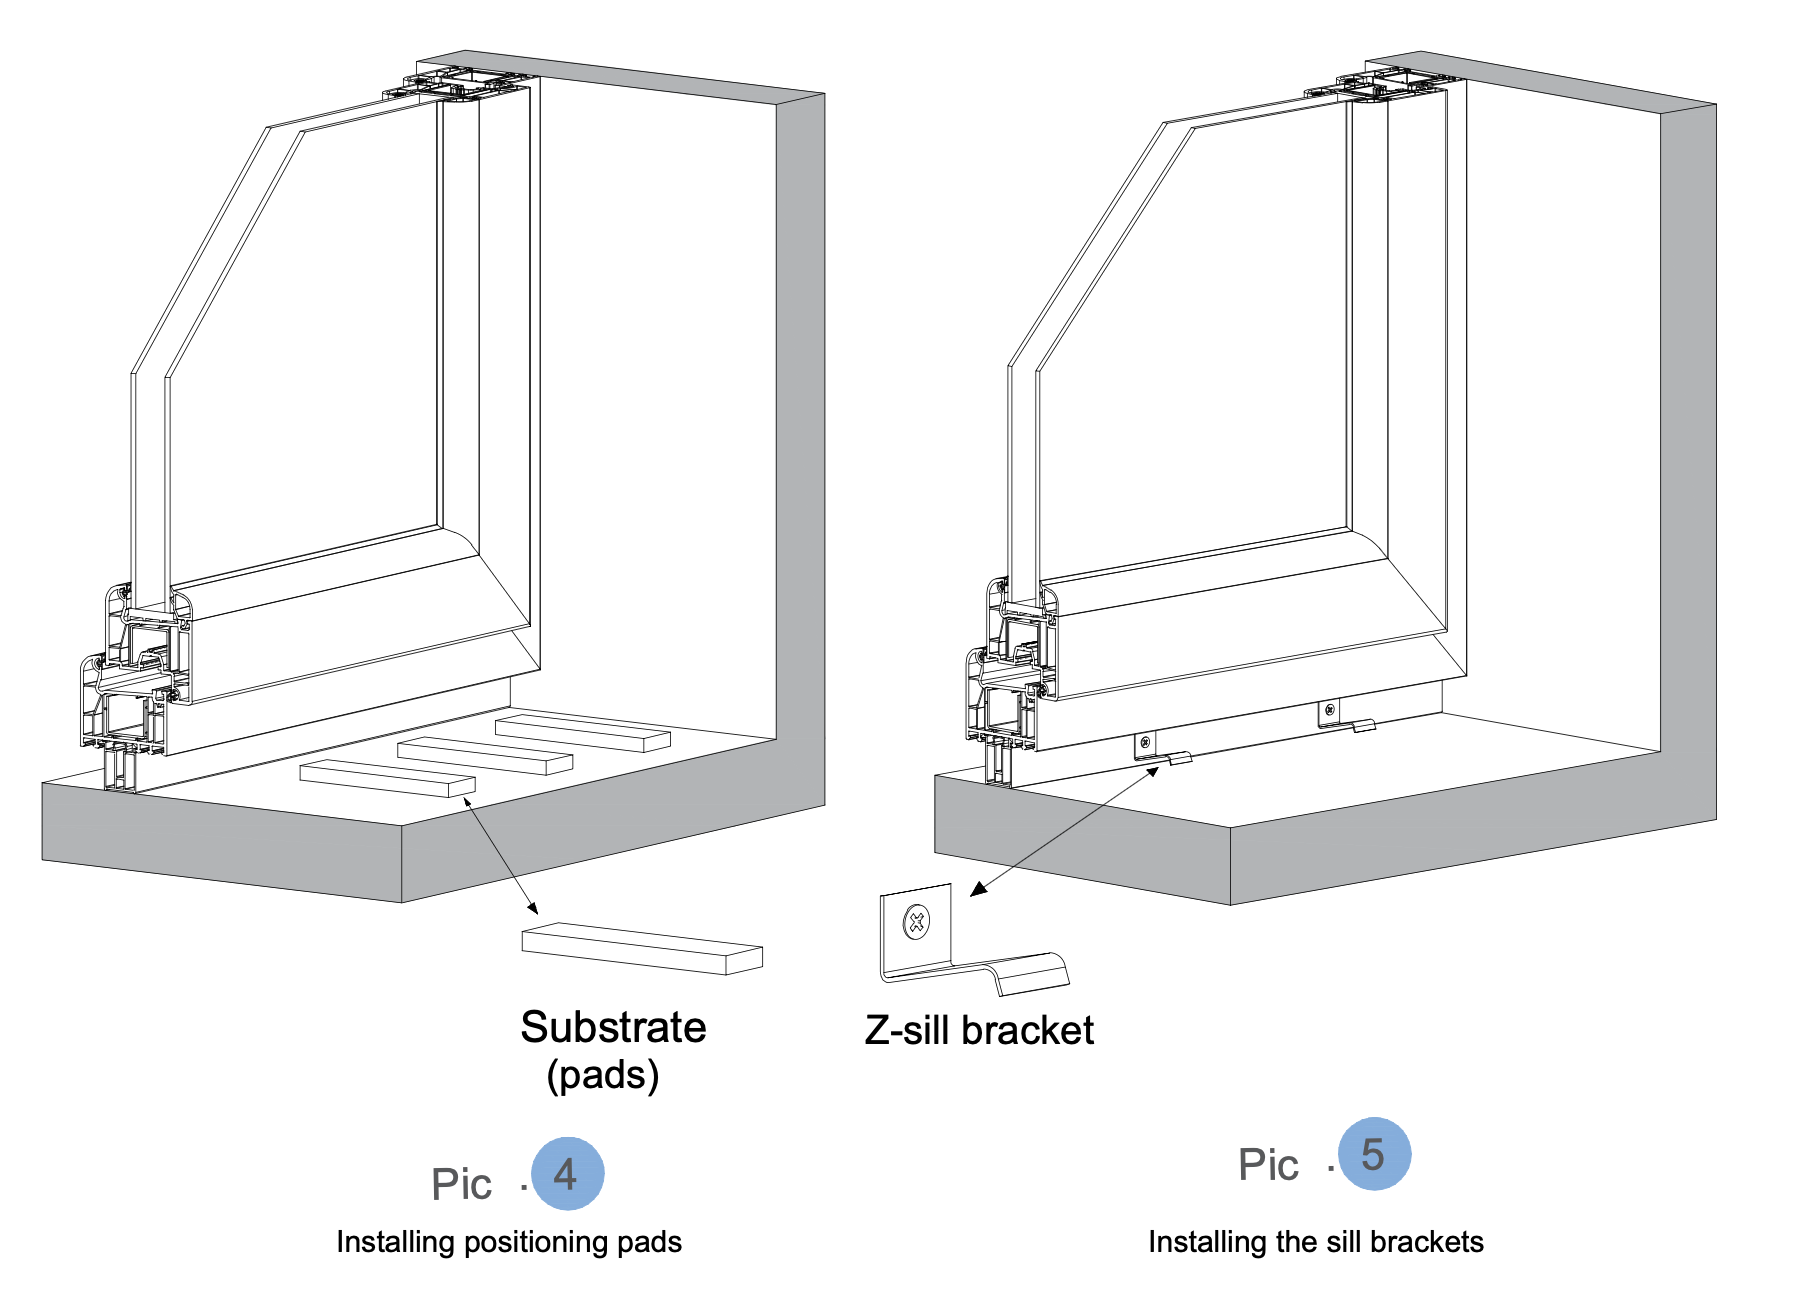
The bracket is attached to the support profile using screws. The length of the screw is selected taking into account the number of internal partitions of the support profile.
In order for the window sill to fit snugly to the window box, it is necessary to install a sufficient number of brackets: for example, 5 brackets for a window width of 1300 mm.
Installation:
Place the window sill under the frame and, pressing it with your hand, press it into place (Fig. 6, Fig. 7).
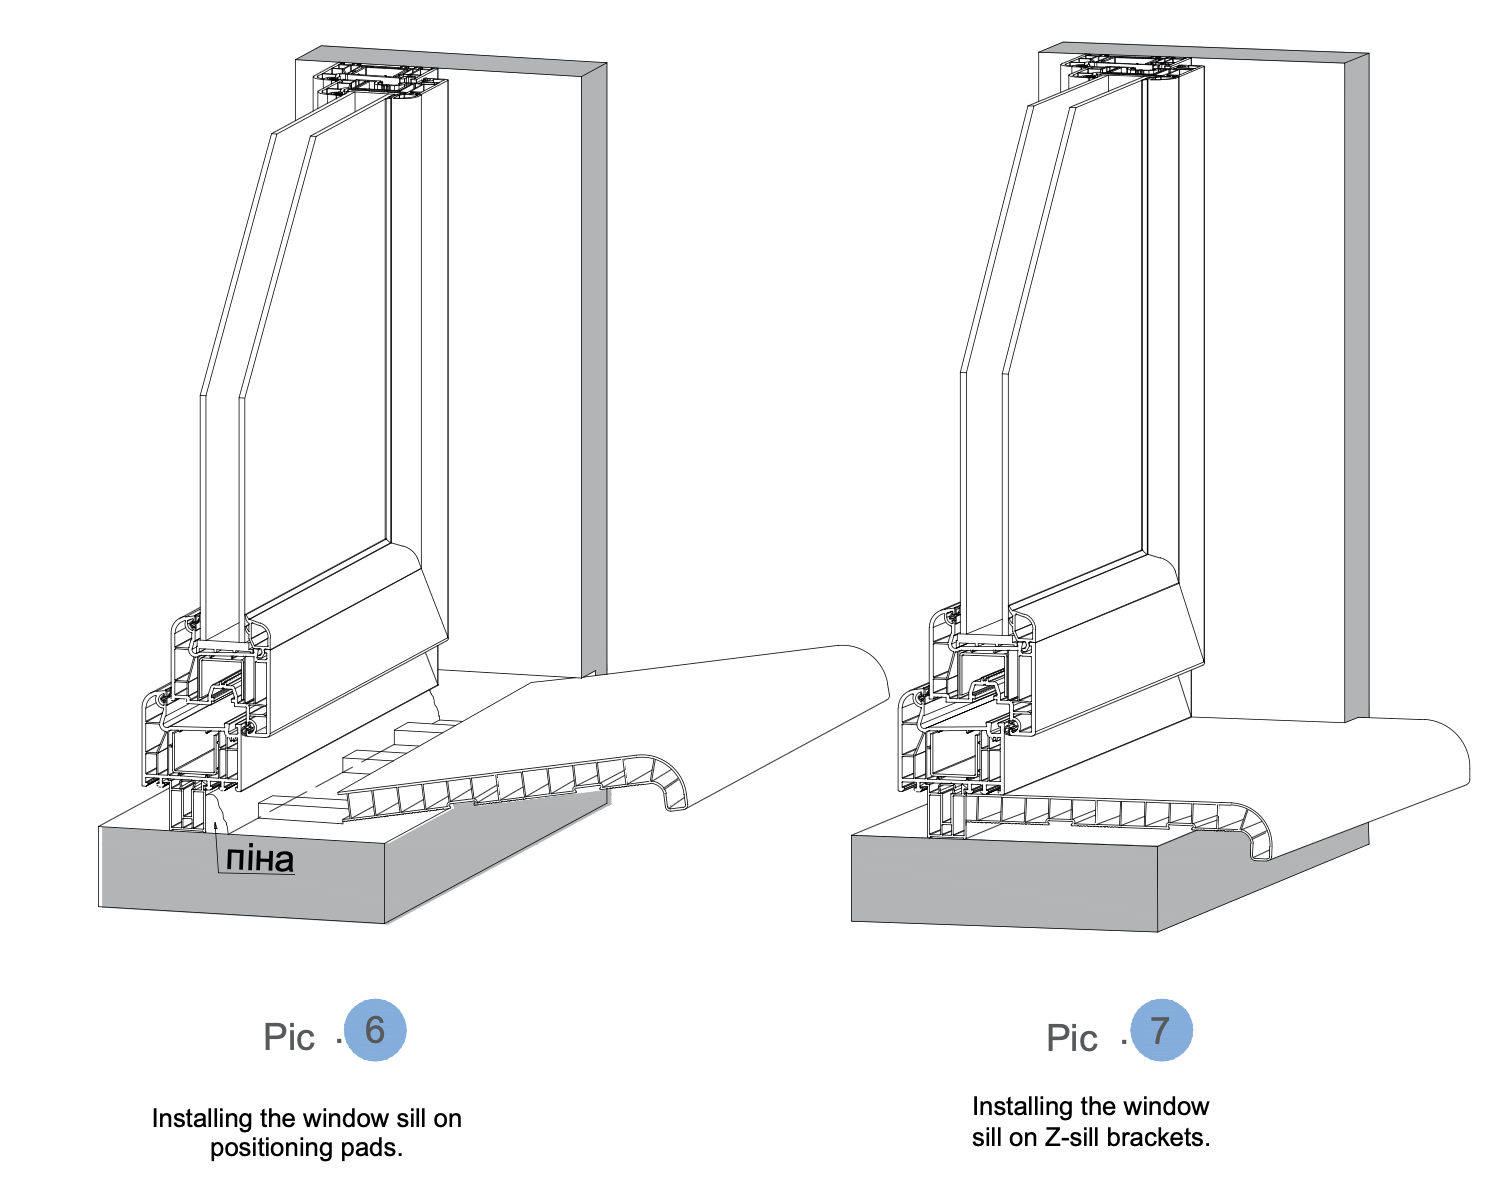
Before applying the mounting foam, the window sill must be pressed tightly against the gaskets and the window. This can be a spacer between the window sill and the upper slope or a heavy load. The load is distributed evenly over the entire surface of the window sill.
Then the foam is blown in. If the space under the installed window sill does not allow using a gun to apply the mounting foam, then apply the foam along the window in a layer about 3 cm wide before installing the window sill.
After installing the window sill, it is necessary to press evenly on the entire front surface until the foam dries completely (at least 24 hours)!
For a tighter fixation of the window sill to the window sill profile, additional fastening is possible using 4×120–150 mm screws. The fastening is carried out from the front of the window sill profile in increments of 300–400 mm.
3. Installation using corner brackets and 2-component mounting foam
This installation method does not differ in terms of preparatory work and features of the connection to the window frame from installation using only 2-component foam, so here we will consider the features of using corner brackets directly.
Distance between fasteners:
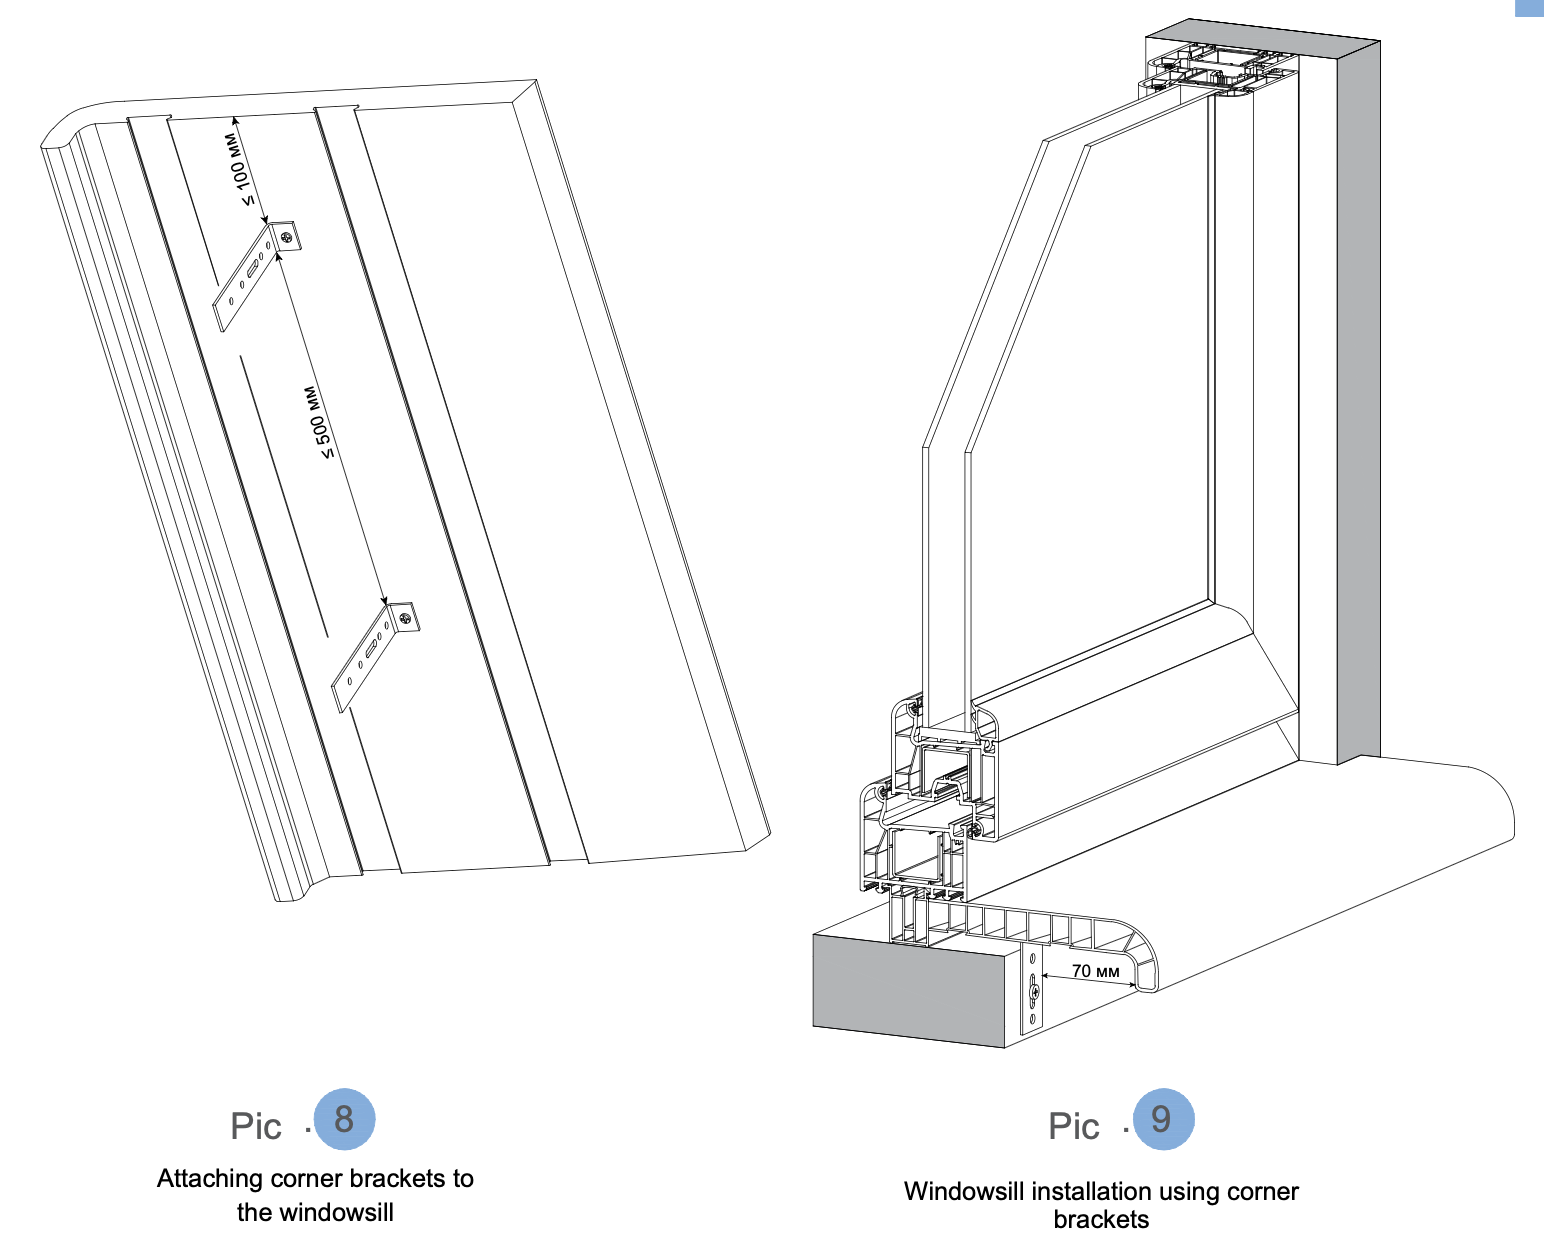
If only 2 brackets are used, the maximum distance between the corner brackets should be 500 mm. The edges of the window sill protruding beyond the bracket should not be more than 100 mm (Fig. 8).
If there are 3 brackets, the maximum distance between the brackets should not be more than 700 mm. The distance measured between the overhanging part of the window sill and the mounting wall should not be more than 70 mm (Fig. 9). RECOMMENDED DISTANCE 50 MM!
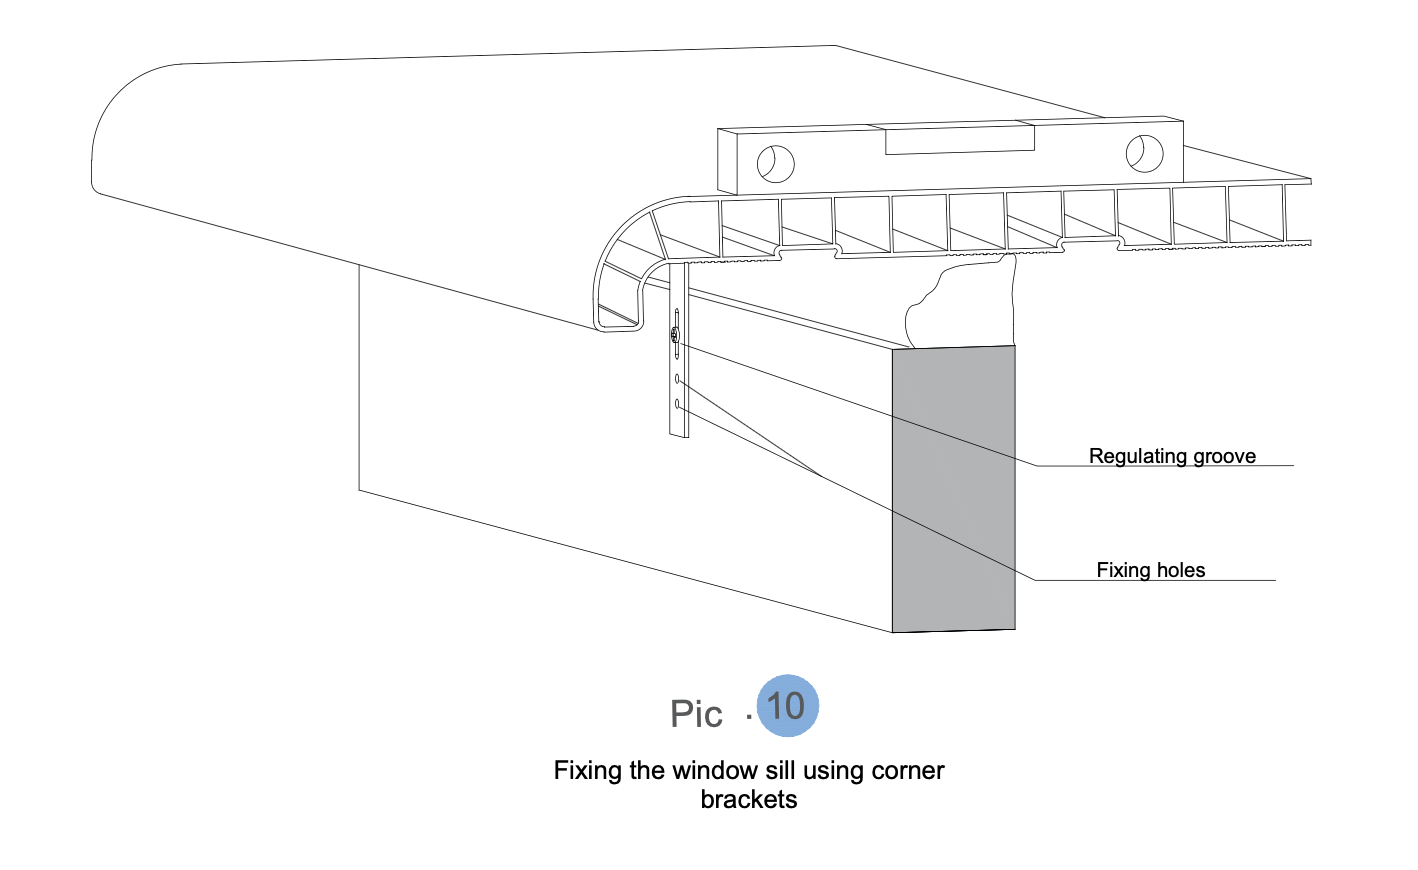
After the bracket is attached to the window sill, insert the window sill under the window frame and, pressing it lightly with your hand, lock it in place.
The window sill with attached corner brackets is installed at the base of the opening. Since this method does not provide for strictly horizontal positioning during installation, it is necessary to set.
Take a level and mark the attachment points on the wall with a pencil through the center of the adjustable holes of the brackets.
At the indicated points, drill a hole through the adjustable groove of the bracket for the impact dowel and secure with a dowel.
Recheck the horizontal position using the level and, if necessary, make additional adjustments by raising or lowering the window sill.
Drill a hole for the impact dowel through the fixing holes of the brackets to finally fix the window sill in a horizontal position.
A mushroom-head impact dowel is used to secure the corner brackets.
Then, using a mounting gun, blow 2-component mounting foam into the free cavity between window sill and opening. After installing the window sill, it is necessary to press evenly on the entire front surface until the foam is completely dry (at least 24 hours)!
4. Installing a window sill on a balcony
Preparatory work:
The basis of such fastening will be brackets. The number of brackets to be installed depends on the length of the window sill being mounted. It is recommended to use 4 pcs. for every meter of the window sill, installing them every 25 cm.
The method of installing the brackets is similar to that discussed above.
Installation:
Put the window sill under the window frame and, pressing from above, press on the brackets.
Next, install the brackets:
Distance between the mounts:
- If only 2 corner brackets are used, the maximum distance between the brackets should be 500 mm.
- When installing, starting from 3 corner brackets in a regular area, the maximum distance between the brackets should be no more than 700 mm.
- The part of the window sill protruding beyond the corner bracket is a maximum of 70 mm.
To secure the window sill to the corner bracket, it is advisable to use cylindrical galvanized screws 3.9×16 or screws with a semicircular head 4.2×16.
5. Connection
Butt connection of the window sill
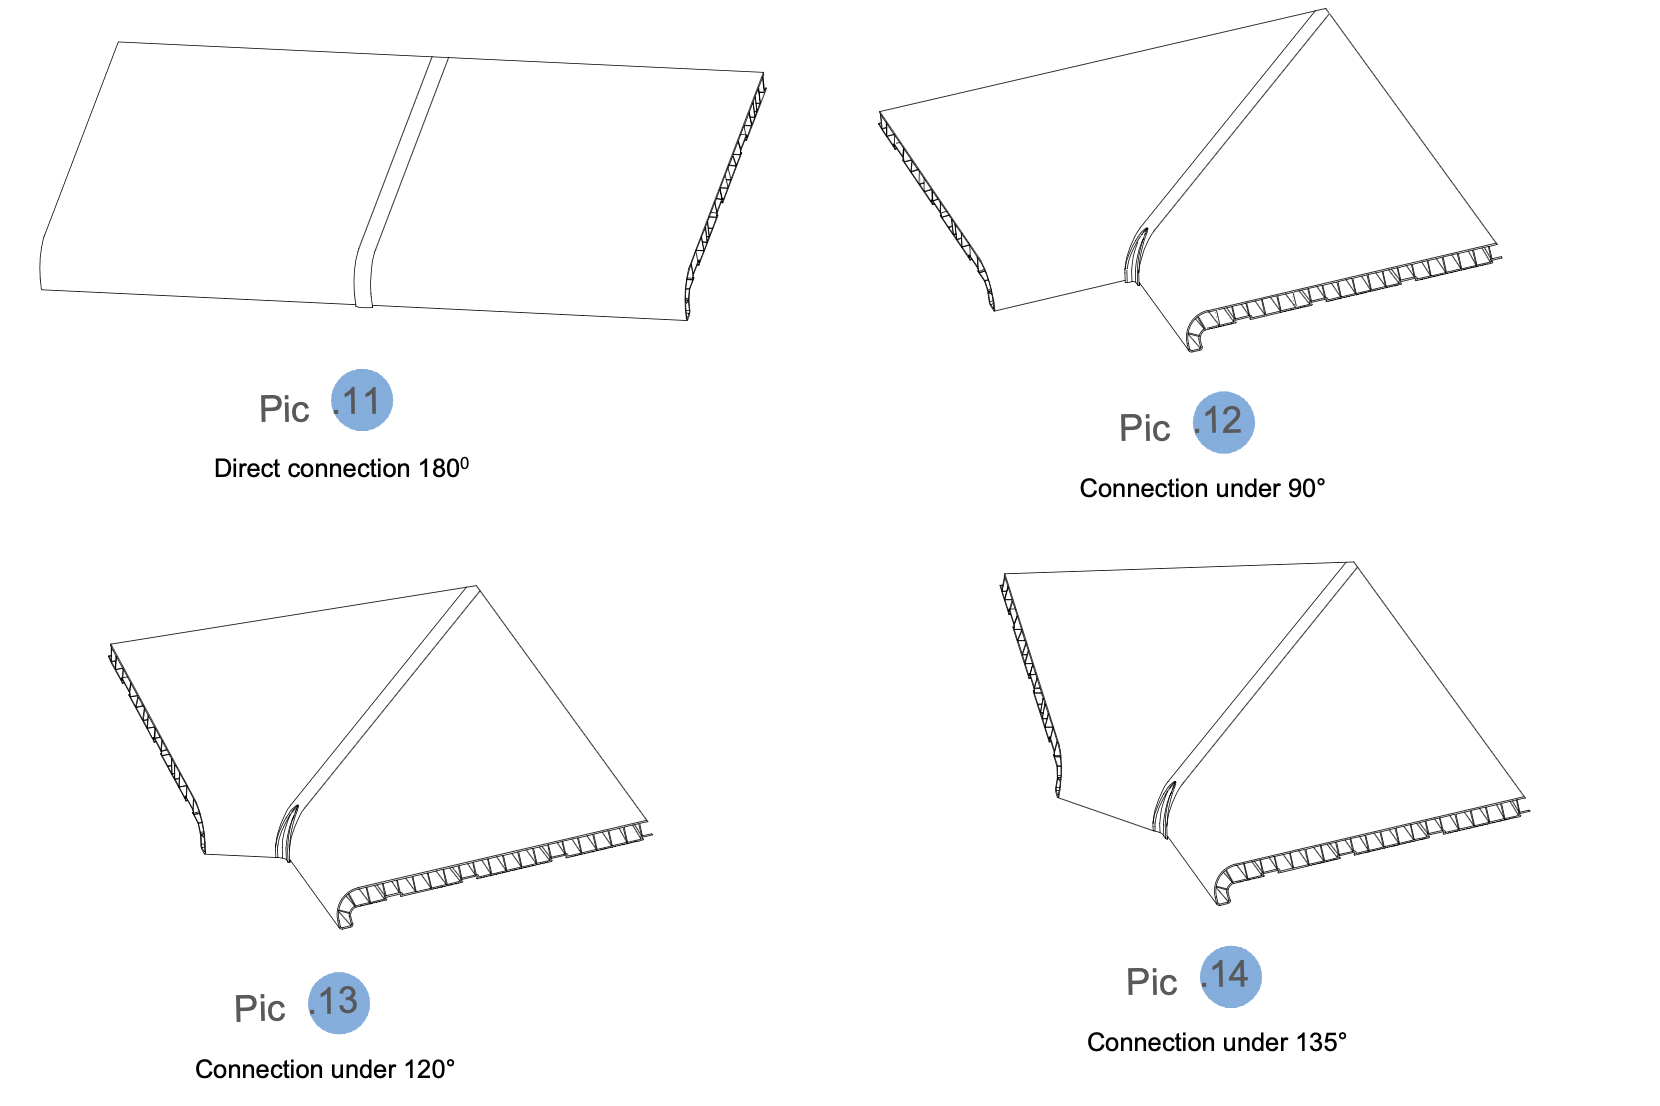
The window sills are connected butt-to-butt with a gap of 1.5 mm per 1 m of the window sill (depending on the total length of the two window sills being joined). The gap is covered with a connecting profile for the window sills (Fig. 11). When installing the window sill on the brackets in the joint area, 2 brackets are installed, the maximum permissible protrusion of the edges of the window sill beyond them is 40 mm.
Connection at an angle
The window sills are connected at an angle, as shown in the figure (Fig. 12, 13, 14), using a connecting profile for joints. The end connector (connecting profile) has two caps and allows you to connect two window sills at an angle of 180°, 90°, 120° and 135°.
We recommend connecting the joints of two window sills located in the same plane at an angle of 90°, 120°, 135° using overlays fixed with screws at the joints from the inner (lower) side of the window sill boards. The linings can be rectangular and attached along the joint on the seam, as well as across the seam.
When the window sill protrudes beyond the wall plane by more than 70 mm, corner brackets are used, as in paragraph 4.3.
Contacts
We are ready to answer your questions promptly and effectively.
- +38 097 215 90 96
- info@patriot-ua.com.ua
- 4B Lisova St., Brovary, Kyiv region, 07400